What is Home Automation System? How to Install an HAS?
How to Install a Home Automation System
Blog Outile:
Introduction
Benefits of Home Automation Systems
- Cost and Energy Savings
- Convenience and Accessibility
- Safety and Security
- Health Monitoring
Home Automation System Components
- Hub or Controller
- Communication Protocols and Standards
- Smart Devices and Appliances
- Software and Mobile Apps
Planning Your Home Automation System
- Assess Your Needs and Budget
- Choose a Hub or Controller
- Select Compatible Devices and Technology
- Design the Layout and Flow
- Consider Professional Installation Help
Setting Up the Hub or Controller
- Determine the Location
- Connect to Power Source
- Connect to Wi-Fi Network
- Complete Initial Setup
Installing Smart Devices and Appliances
- Lights and Switches
- Thermostats
- Locks
- Cameras
- Sensors
- Speakers and Displays
Connecting and Configuring Devices
- Pairing and Linking Devices
- Adjusting Settings and Preferences
- Updating Firmware
- Testing Connectivity
Automating and Programming
- Creating Scenes and Routines
- Setting Schedules and Timers
- Integrating with Other Smart Devices
- Enabling Remote Access and Control
Troubleshooting Your System
- Checking Connections and Compatibility
- Resetting or Power Cycling Devices
- Updating Software and Firmware
- Contacting Manufacturers for Support
Maintaining and Enhancing Your System
- Regularly Backing Up Configurations
- Adding New Devices and Features
- Monitoring Activity Logs
- Adjusting Settings Over Time
Home Automation System Security
- Strong Passwords and Multi-factor Authentication
- Software Updates and Patches
- Network Segmentation
- Activity Notifications
Conclusion
How to Install a Home Automation System
Introduction
Home automation systems are becoming increasingly popular, allowing homeowners to remotely control, automate, and monitor different home systems and appliances for added convenience, efficiency, and security. Installing a home automation system may seem intimidating initially, but breaking down the process into more manageable steps can make it easy. Proper planning, setup, installation, configuration, and testing are key to implementing a functional home automation system that meets your needs and budget.
In this comprehensive guide, we will walk you through the key steps and considerations when installing a home automation system in your home, from assessing your needs to troubleshooting issues after setup. With the right guidance, a conveniently automated home can run smoothly.
Benefits of Home Automation Systems
Before diving into the installation process, it is essential to understand the many benefits that home automation systems offer:
Cost and Energy Savings
One of the biggest benefits of an automated home is the ability to realize cost and energy savings from better monitoring and control of lighting, HVAC systems, and appliances. Smart thermostats, programmable and scheduling capabilities, and energy use monitoring allow you to adjust settings for efficiency.
Convenience and Accessibility
Home automation systems allow you to control devices and appliances remotely from your smartphone or voice control them hands-free, adding convenience to your daily life. Remote access features also allow you to manage your home while away.
Safety and Security
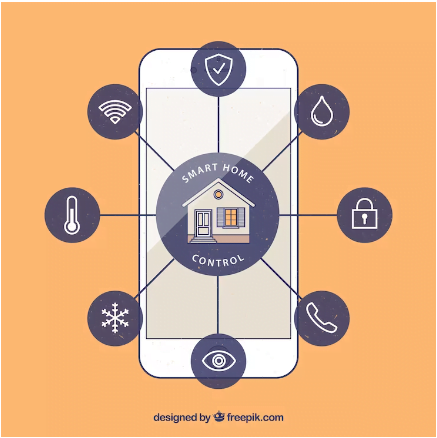
Automated safety and security features like smart locks, cameras, motion sensors, and smoke detectors can monitor your home in real time and send you notifications for enhanced peace of mind about your home’s protection.
Health Monitoring
Some home automation systems integrate with fitness trackers or vital sign monitoring devices, allowing you to monitor key health metrics right from your smartphone app.
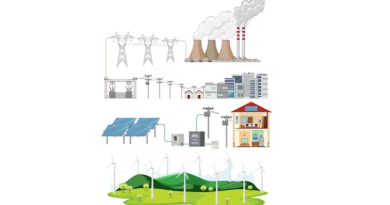
Home Automation System Components
A home automation system comprises different smart devices and appliances that connect to a central hub or controller. Key components include:
Hub or Controller
This is the brains of a home automation system, connecting to all devices and allowing for control and automation. It can be a standalone physical hub, a multifunction device like Amazon Echo, or cloud-based software.
Communication Protocols and Standards
To connect and interact, devices and hubs must use compatible wireless communication protocols like Wi-Fi, ZigBee, Z-Wave, Bluetooth, or Thread.
Smart Devices and Appliances
These include smart plugs, lights, switches, thermostats, locks, cameras, sensors, smoke detectors, shades, and other compatible smart devices that plug in or wire into your home’s electricity and systems.
Software and Mobile Apps
An app on your smartphone, tablet, or computer allows you to remotely configure, control, and monitor your home automation system and connected devices.
Planning Your Home Automation System
Careful planning is required before installation to ensure your home automation system works smoothly and meets your needs. Key planning steps include:
Assess Your Needs and Budget
Determine what kinds of devices and levels of automation would be most beneficial for your home. Develop a budget for equipment costs, setup and installation fees, and ongoing subscription fees (if applicable).
Choose a Hub or Controller
Research hubs that meet your technical needs and budget. Consider whether you want a standalone hub, multifunction voice assistant device, or cloud-based system.
Select Compatible Devices and Technology
Choose devices like lights, switches, locks, thermostats, etc., that are compatible with your hub technology and wireless protocols.
Design the Layout and Flow
Map where devices must be located and how scenes and automation should function. Group devices by location or function.
Consider Professional Installation Help
If wiring, electrical work, or integration with existing systems is needed, seek quotes from professional home automation installers.
Setting Up the Hub or Controller
With planning complete, it’s time to set up the home automation hub or controller:
Determine the Location
Centrally place the hub for optimal wireless coverage. Avoid interference from appliances. Place near an Ethernet port if wired.
Connect to Power Source
For standalone hubs, plug into an outlet. Devices like Echo or Nest may run on battery or simply need a USB plug.
Connect to Wi-Fi Network
Connect to your secure wireless network through the hub’s app. An ethernet connection is an option too.
Complete Initial Setup
Follow the instructions to create an account, register devices to the hub, and configure basic settings.
Installing Smart Devices and Appliances
Next, install the various smart devices and appliances in appropriate locations:
Lights and Switches
Hardwire smart bulbs, power outlets, and light switches, replacing existing fixtures. Follow electrical safety precautions.
Thermostats
Replace old thermostats with intelligent models on the wall. Follow the wiring instructions carefully.
Locks
Install smart locks on exterior doors and garage doors. Pay attention to measurements.
Cameras
Mount indoor/outdoor security cameras with clear, unobstructed views and power sources.
Sensors
Place smart sensors like water leaks and motion detectors in key locations. Check wireless connectivity.
Speakers and Displays
Place centrally for access in multiple rooms for devices like Amazon Echo and Google Nest Hub.
Connecting and Configuring Devices
After installing devices, it’s time to get them connected and configured correctly:
Pairing and Linking Devices
Use the hub’s app to pair each device to the hub, following the instructions. Confirm connectivity.
Adjusting Settings and Preferences
Configure devices’ names, groups, notifications, and other settings to your needs and preferences.
Updating Firmware
Check and install any latest firmware updates on devices and hub for optimal performance and security.
Testing Connectivity
Check that all devices connect reliably to the hub by power cycling and testing remote access.
Automating and Programming
Here is where you get to take advantage of home automation programming:
Creating Scenes and Routines
Use the app to configure multi-device scenes and scheduled routines like “Good Morning”.
Setting Schedules and Timers
Program devices to turn on/off or adjust settings automatically by time of day or sunrise/sunset.
Integrating with Other Smart Devices
Connect your home automation system with other device ecosystems like Apple HomeKit for expanded functionality.
Enabling Remote Access and Control
Activate remote connectivity features to access your system when away from home via smartphone.
Troubleshooting Your System
Despite best efforts, issues can pop up when installing a home automation system. Here is how to troubleshoot:
Checking Connections and Compatibility
If a device is not responding, check it is powered on and connected to the hub’s wireless network.
Resetting or Power Cycling Devices
Reset unresponsive devices and power cycle them to refresh the connection.
Updating Software and Firmware
Install the latest firmware and software updates to fix connectivity bugs.
Contacting Manufacturers for Support
Contact the device manufacturer and hub company for technical support if issues persist.
Maintaining and Enhancing Your System
Ongoing maintenance is required to keep your system working optimally:
Regularly Backing Up Configurations
Back up automation settings, device settings, and other programming in case of failures.
Adding New Devices and Features
Improve your system over time by adding new compatible smart devices and capabilities.
Monitoring Activity Logs
Check hub and app logs periodically for any connectivity issues or failed automation.
Adjusting Settings Over Time
Tweak schedules, scenes, and preferences occasionally to suit your changing needs better.
Home Automation System Security
It is crucial to keep home automation systems secure:
Strong Passwords and Multi-factor Authentication
Use hard-to-guess passwords and enable multi-factor authentication where possible.
Software Updates and Patches
Keep the system software, apps, and firmware updated to fix vulnerabilities.
Network Segmentation
Isolate home automation networks and devices from other networks and smart home devices.
Activity Notifications
Enable notifications about automation activity to detect any unauthorized access or control.
Conclusion
Installing a home automation system involves careful planning, setup, installation, configuration, and testing of the various components to get them working seamlessly together. While the process has many steps, breaking it down into more manageable phases can make implementing a system customized to your needs, budget, and home easy. With proper ongoing maintenance and security, a home automation system allows you to enjoy automated control and peace of mind. Contact home automation professionals if you need assistance designing or installing a more complex system.
Frequently Asked Questions about Installing Home Automation Systems
What are the most popular wireless protocols used for home automation?
Wi-Fi, Z-Wave, Zigbee, Bluetooth, and Thread are the most widely used wireless protocols. Each has pros and cons, so research which works best for your needed devices.
How difficult is it to install a home automation system yourself?
Basic systems with an intelligent hub, lights, and locks can be DIY-friendly. More complex wiring or integration requires professional installation.
How can I make sure my automation system is secure?
Use strong, unique passwords, enable multi-factor authentication, isolate the automation network, keep firmware updated, and enable activity notifications.
What are some troubleshooting tips for a problematic home automation installation?
Check device connections, power cycle devices, update firmware, test connectivity around the home, and contact manufacturers if issues persist.
How much does a professionally installed home automation system cost?
A professionally installed system can range from $2,000 to $15,000 depending on size, complexity, and devices included. Ongoing subscription fees may also apply.